Why a Vault?
The reason for having a vault is to have the secrets for the application stored in a very "safe" / "secure" location so that only trusted clients of the Vault (Web Apps / Services etc ) can get access to the secrets.
When we do not use a vault, the dev team will check-in the secrets like Database Credentials, AWS credentials etc to the source control, which leaves it open to be accessible to anyone that gets access to source code.
There are a lot of Vaults out there in AWS, Azure etc, but this system is opensource and we have full control of the installation and security, which piqued my interest and hence I started exploration.
Dangers of exposing Secrets
- In the hands of wrong person, it could be disastrous, especially if the secret has more privileges, more the depth of the damage
- Developers might get to try out changes with these credentials. In recent years, a colleague of mine forgot to append the where clause in the production database and ran the query, given that he was self-confident in production database access. Its easy to err, but to learn and move forward is important.
- When exposed to hackers, this could be very disastrous like leakage of data, loss of critical / sensitive data. I always keep an eye out for the mails from "Have I been Pwned"
Benefits
- Central Storage of Secrets
- Easy to Scale and audit the usage
- Easy to rotate the keys and apps do not need to update their config or worry about the change to secrets
- Easy to revoke access to a compromised application, just revoke the token / user access to Vault, nothing could go wrong
My Experiment
In order to get a feel of how the vault works, I have tried to setup in an EC2 server within a VPC. You can get good lot of details on how to setup vault in server through this link
Once Installed, I had the UI enabled so that I can use through the UI. In the real time, these will be run only through scripts like Terraforms that create and configure the vault as part of the DevOps pipeline flows
Tokens
- Admin / Root
- This is the super user of the vault, this user gets to enable the engines (KV / cubbyhole etc)
- create the keys if it is known before hand
- Create access policies (these are the rules that govern who gets to access what). Every policy will decide what parts of the system is accessible and how far is the depth of the access granted (Ex: Admins can Create, Update, Delete, whereas the end user can just Read)
- Creates the tokens by choosing the policies.
- Though the tokens are created, this can be renewed later at any given point of time. Ideally every 45 to 90 days renewal window should be good and safe
- End User
- Consume the secrets that have been granted access to by the policy.
- Renew tokens
- Access the Vault through the UI for easy use
- Use the tokens to access through HTTP API / CLI (Command Line Interface)
Policy
Herewith I have given the sample policy that I have created, it took a while for me to get started with the right policy through the help of the Vault support team, it was very easy for me. My sincere thanks to the Vault Support Team :)
Sample Policy
# Allow tokens to look up their own properties
path "auth/token/lookup-self" {
capabilities = ["read"]
}
# Allow tokens to renew themselves
path "auth/token/renew-self" {
capabilities = ["update"]
}
# Allow a token to look up its own capabilities on a path
path "sys/capabilities-self" {
capabilities = ["update"]
}
# <-- SNIP -->
# Allow a token to look up its resultant ACL from all policies. This is useful
# for UIs. It is an internal path because the format may change at any time
# based on how the internal ACL features and capabilities change.
path "sys/internal/ui/resultant-acl" {
capabilities = ["read"]
}
# <-- SNIP -->
# grant the permission to the entire KV engine
path "kv/*" {
capabilities = ["read","list", "create", "update"]
}
# grant list permissions to the metadata for the secrets inside the kv engine
path "kv/metadata/secret/*" {
capabilities = ["list"]
}
# grant list, create and update permissions for managing the secret data.
# Notice that this data and the above one is Metadata
path "kv/data/secret/*" {
capabilities = ["list","create", "update"]
}
# Provide the list and read permission for a specific kv secret.
# Any token with this policy can just list and read the values, they cannot tamper the secrets or delete them
path "kv/data/secret/clients-integration" {
capabilities = ["list","read"]
}Creating and consuming tokens
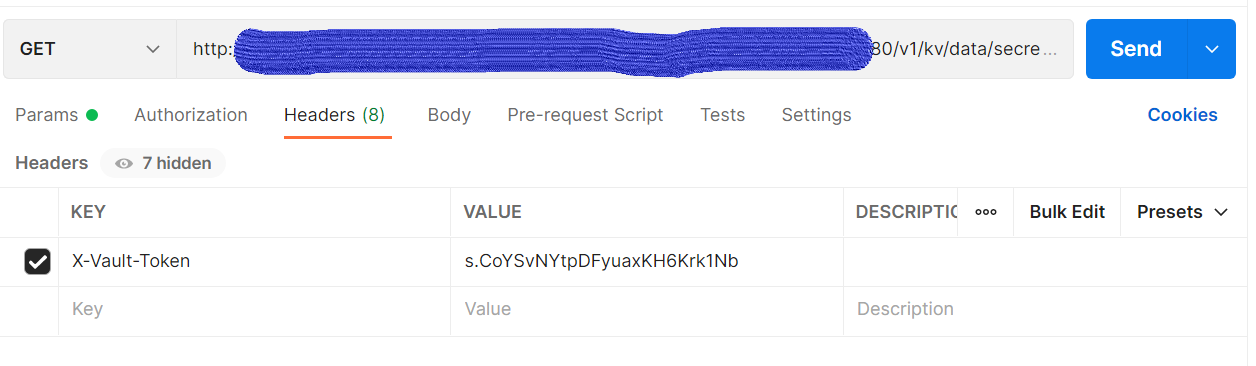
In order to test the policy and create a token for a end-user, I have used below like command
vault token create -policy=readonly-policy default -display-name=svc-app-readonlyOnce the token generation is done from the above, the token can be used directly in postman to fetch the secrets. The below screenshot from postman will help view how to setup the header and get the value from vault with right token
Conclusion
As always, getting started with the vault was a bit tough, but with perseverance and support from the Vault team, I was able to get this sample PoC done.
Note: This post illustrates a sample PoC that I have tried out and is not suitable for production environments, Please exercise caution.
Hope this helps anyone exploring in Hashicorp Vault.
Comments
Post a Comment